vSRX - your personal laptop firewall!
I love to lab.
One of the problems of running anything in a 'lab' environment, however, is that it can be a bit too clinical. Traffic generation can become a chore. Earlier this week, I was using Vagrant to spin up some vSRX labs on my laptop when it occurred to me that I could probably just gateway my native traffic through a VM.
There's probably a few ways to achieve this but here are the steps I followed:
1. sudo apt update
2. sudo apt install virtualbox
3. wget https://releases.hashicorp.com/vagrant/2.2.6/vagrant_2.2.6_x86_64.deb (earlier versions are plagued with bugs)
4. sudo dpkg -i vagrant_2.2.6_x86_64.deb
5. vagrant plugin install vagrant-host-shell
6. vagrant plugin install vagrant-junos
7. mkdir vsrx
8. cd vsrx
9. vagrant init juniper/ffp-12.1X47-D15.4
10. vagrant up
Michael@schumacher:/vsrx$ vagrant status
Current machine states:

default                   running (virtualbox)

The VM is running. To stop this VM, you can run `vagrant halt` to
shut it down forcefully, or you can run `vagrant suspend` to simply
suspend the virtual machine. In either case, to restart it again,
simply run `vagrant up`.

Michael@schumacher:/vsrx$ vagrant ssh default
--- JUNOS 12.1X47-D15.4 built 2014-11-12 02:13:59 UTC
root@vsrx% cli
root@vsrx> show interfaces terse
Interface               Admin Link Proto    Local                 Remote
ge-0/0/0                up    up
ge-0/0/0.0              up    up   inet     10.0.2.15/24
gr-0/0/0                up    up
ip-0/0/0                up    up
lsq-0/0/0               up    up
lt-0/0/0                up    up
mt-0/0/0                up    up
sp-0/0/0                up    up
sp-0/0/0.0              up    up   inet
                                   inet6
sp-0/0/0.16383          up    up   inet     10.0.0.1            --> 10.0.0.16
                                            10.0.0.6            --> 0/0
                                            128.0.0.1           --> 128.0.1.16
                                            128.0.0.6           --> 0/0
dsc                     up    up
gre                     up    up
ipip                    up    up
irb                     up    up
lo0                     up    up
lo0.16384               up    up   inet     127.0.0.1           --> 0/0
lo0.16385               up    up   inet     10.0.0.1            --> 0/0
                                            10.0.0.16           --> 0/0
                                            128.0.0.1           --> 0/0
                                            128.0.0.4           --> 0/0
                                            128.0.1.16          --> 0/0
lo0.32768               up    up
lsi                     up    up
mtun                    up    up
pimd                    up    up
pime                    up    up
pp0                     up    up
ppd0                    up    up
ppe0                    up    up
st0                     up    up
tap                     up    up
vlan                    up    down

root@vsrx> exit

root@vsrx% exit
logout
Connection to 127.0.0.1 closed.

Michael@schumacher:/vsrx$ vagrant destroy -f
==> default: Forcing shutdown of VM...
==> default: Destroying VM and associated drives...
So that gets us a basic vSRX up and running.
Next, we'll need to define an inside (tap0) interface and an outside (wlan0) interface that we can bridge the VM to. Wireless access points tend to be picky about allowing foreign MACs through the front door so we'll allow the native adapter to authenticate to the AP but we'll remove the ability to initialise the IP stack, before gifting the native MAC to vSRX.
First, let's check the MAC address on wlan0:
Michael@schumacher:/vsrx$ ifconfig wlan0 | grep ether
        ether a1:b1:c1:d1:e1:f1  txqueuelen 1000  (Ethernet)
Next, let's replace the Vagrantfile. Don't forget to pop your MAC address in there:
Vagrant.configure(2) do |config|
  config.vm.box = "juniper/ffp-12.1X47-D15.4"
  config.vm.provider "virtualbox" do |vb|
    vb.memory = 512
    vb.cpus = 2
    vb.gui = false
  end

config.vm.define "vsrx" do |vsrx|
    vsrx.vm.host_name = "vSRX"
    vsrx.vm.network "public_network", auto_config: false, bridge: "wlan0", :mac => "a1b1c1d1e1f1"
    vsrx.vm.network "public_network", auto_config: false, bridge: "tap0"
    vsrx.vm.provision "file", source: "scripts/vsrx.sh", destination: "/tmp/vsrx.sh"
    vsrx.vm.provision :host_shell do |host_shell|
      host_shell.inline = 'vagrant ssh vsrx -c "/usr/sbin/cli -f /tmp/vsrx.sh"'
    end
  end
end
We'll also need to create a 'scripts' directory within the vsrx folder to hold the vsrx.sh file we've referenced above. Vagrant commandeers ge-0/0/0 for management, which leaves us with ge-0/0/1 for wlan0 and ge-0/0/2 for our virtual adapter, tap0:
configure

set system services web-management http interface ge-0/0/2.0

set security zones security-zone untrust interfaces ge-0/0/1 host-inbound-traffic system-services dhcp
set security zones security-zone untrust host-inbound-traffic system-services ping

set security zones security-zone trust interfaces ge-0/0/2 host-inbound-traffic system-services protocols all
set security zones security-zone trust host-inbound-traffic system-services all

set routing-instances INTERNET instance-type virtual-router
set routing-instances INTERNET interface ge-0/0/1.0
set routing-instances INTERNET interface ge-0/0/2.0

set security nat source rule-set TRUST-TO-UNTRUST from zone trust
set security nat source rule-set TRUST-TO-UNTRUST to zone untrust
set security nat source rule-set TRUST-TO-UNTRUST rule TRUST-TO-INTERNET match source-address 10.88.88.0/24
set security nat source rule-set TRUST-TO-UNTRUST rule TRUST-TO-INTERNET match destination-address 0.0.0.0/0
set security nat source rule-set TRUST-TO-UNTRUST rule TRUST-TO-INTERNET then source-nat interface

set interfaces ge-0/0/1 description "Bridged - wlan0"
set interfaces ge-0/0/1 unit 0 family inet dhcp

set interfaces ge-0/0/2 description "Bridged - tap0"
set interfaces ge-0/0/2 unit 0 family inet address 10.88.88.1/24

commit and-quit
The vsrx.sh is simply the config we will automatically push to the device every time it's instantiated.
Next, let's bring up the virtual interface and fire some DNS into resolv.conf:
ip tuntap add tap0 mode tap
ip addr add 10.88.88.111/24 dev tap0
ip link set dev tap0 up
ip route add default via 10.88.88.1

echo "nameserver 8.8.8.8" >> /etc/resolv.conf
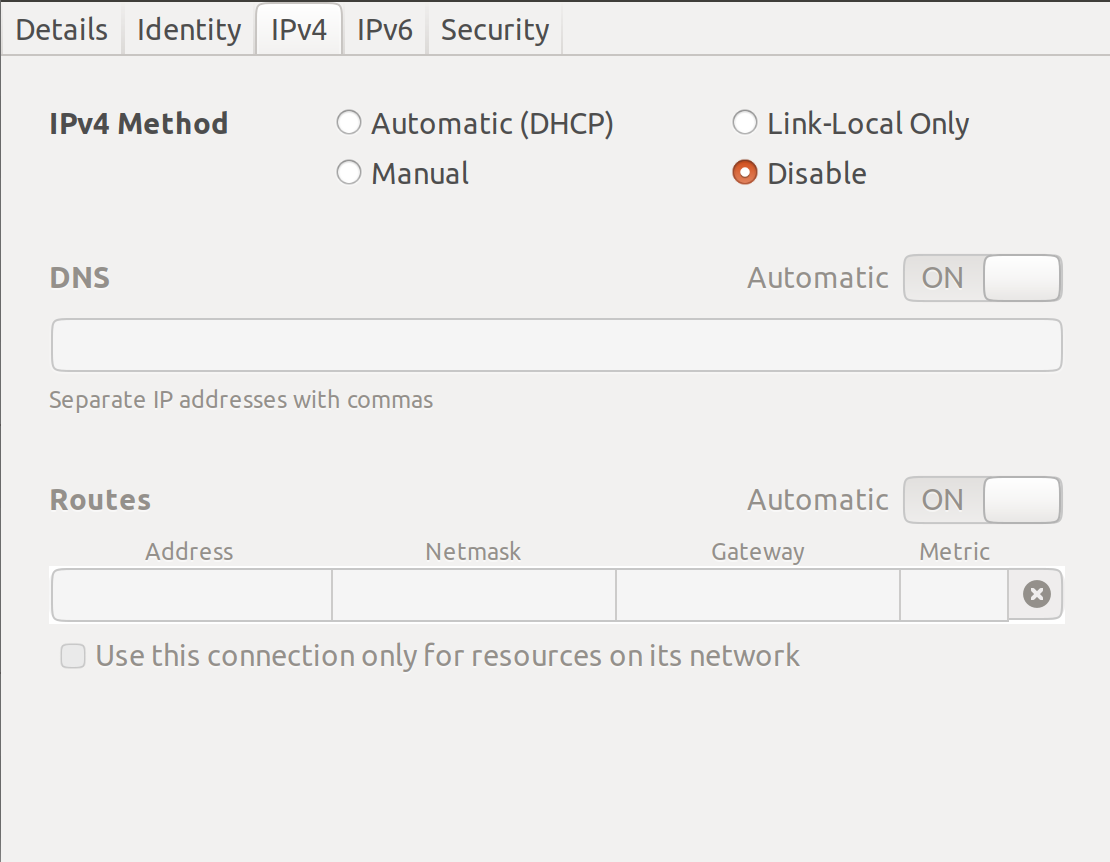
Let's not forget to disable any IP allocation on the wireless interface. Do the same for IPv6, too. All traffic must go via vSRX:
Time to bring up the VM and test:
root@vSRX> ping routing-instance INTERNET 8.8.8.8
PING 8.8.8.8 (8.8.8.8): 56 data bytes
64 bytes from 8.8.8.8: icmp_seq=0 ttl=57 time=30.447 ms
64 bytes from 8.8.8.8: icmp_seq=1 ttl=57 time=14.362 ms
64 bytes from 8.8.8.8: icmp_seq=2 ttl=57 time=15.521 ms
64 bytes from 8.8.8.8: icmp_seq=3 ttl=57 time=14.575 ms
64 bytes from 8.8.8.8: icmp_seq=4 ttl=57 time=15.369 ms
64 bytes from 8.8.8.8: icmp_seq=5 ttl=57 time=17.851 ms
^C
--- 8.8.8.8 ping statistics ---
6 packets transmitted, 6 packets received, 0% packet loss
round-trip min/avg/max/stddev = 14.362/18.021/30.447/5.671 ms
Silky smooth but does the host, my laptop, actually have internet connectivity?
Michael@schumacher:/vsrx$ ping bbc.co.uk
PING bbc.co.uk (151.101.128.81) 56(84) bytes of data.
64 bytes from 151.101.128.81 (151.101.128.81): icmp_seq=1 ttl=59 time=14.7 ms
64 bytes from 151.101.128.81 (151.101.128.81): icmp_seq=2 ttl=59 time=18.3 ms
64 bytes from 151.101.128.81 (151.101.128.81): icmp_seq=3 ttl=59 time=15.3 ms
64 bytes from 151.101.128.81 (151.101.128.81): icmp_seq=4 ttl=59 time=15.2 ms
64 bytes from 151.101.128.81 (151.101.128.81): icmp_seq=5 ttl=59 time=15.4 ms
^C
--- bbc.co.uk ping statistics ---
5 packets transmitted, 5 received, 0% packet loss, time 4002ms
rtt min/avg/max/mdev = 14.743/15.812/18.377/1.307 ms

Michael@schumacher:/vsrx$ route
Kernel IP routing table
Destination     Gateway         Genmask         Flags Metric Ref    Use Iface
default         _gateway        0.0.0.0         UG    0      0        0 tap0
10.88.88.0      0.0.0.0         255.255.255.0   U     0      0        0 tap0
link-local      0.0.0.0         255.255.0.0     U     1000   0        0 virbr0
172.17.0.0      0.0.0.0         255.255.0.0     U     0      0        0 docker0
192.168.122.0   0.0.0.0         255.255.255.0   U     0      0        0 virbr0
192.168.123.0   0.0.0.0         255.255.255.0   U     0      0        0 green_net
192.168.124.0   0.0.0.0         255.255.255.0   U     0      0        0 red_net


root@vSRX> show security flow session | match icmp
  In: 10.88.88.111/2 --> 151.101.128.81/13698;icmp, If: ge-0/0/2.0, Pkts: 1, Bytes: 84
  Out: 151.101.128.81/13698 --> 10.14.41.109/29492;icmp, If: ge-0/0/1.0, Pkts: 1, Bytes: 84
  In: 10.88.88.111/3 --> 151.101.128.81/13698;icmp, If: ge-0/0/2.0, Pkts: 1, Bytes: 84
  Out: 151.101.128.81/13698 --> 10.14.41.109/22708;icmp, If: ge-0/0/1.0, Pkts: 1, Bytes: 84
Job done!
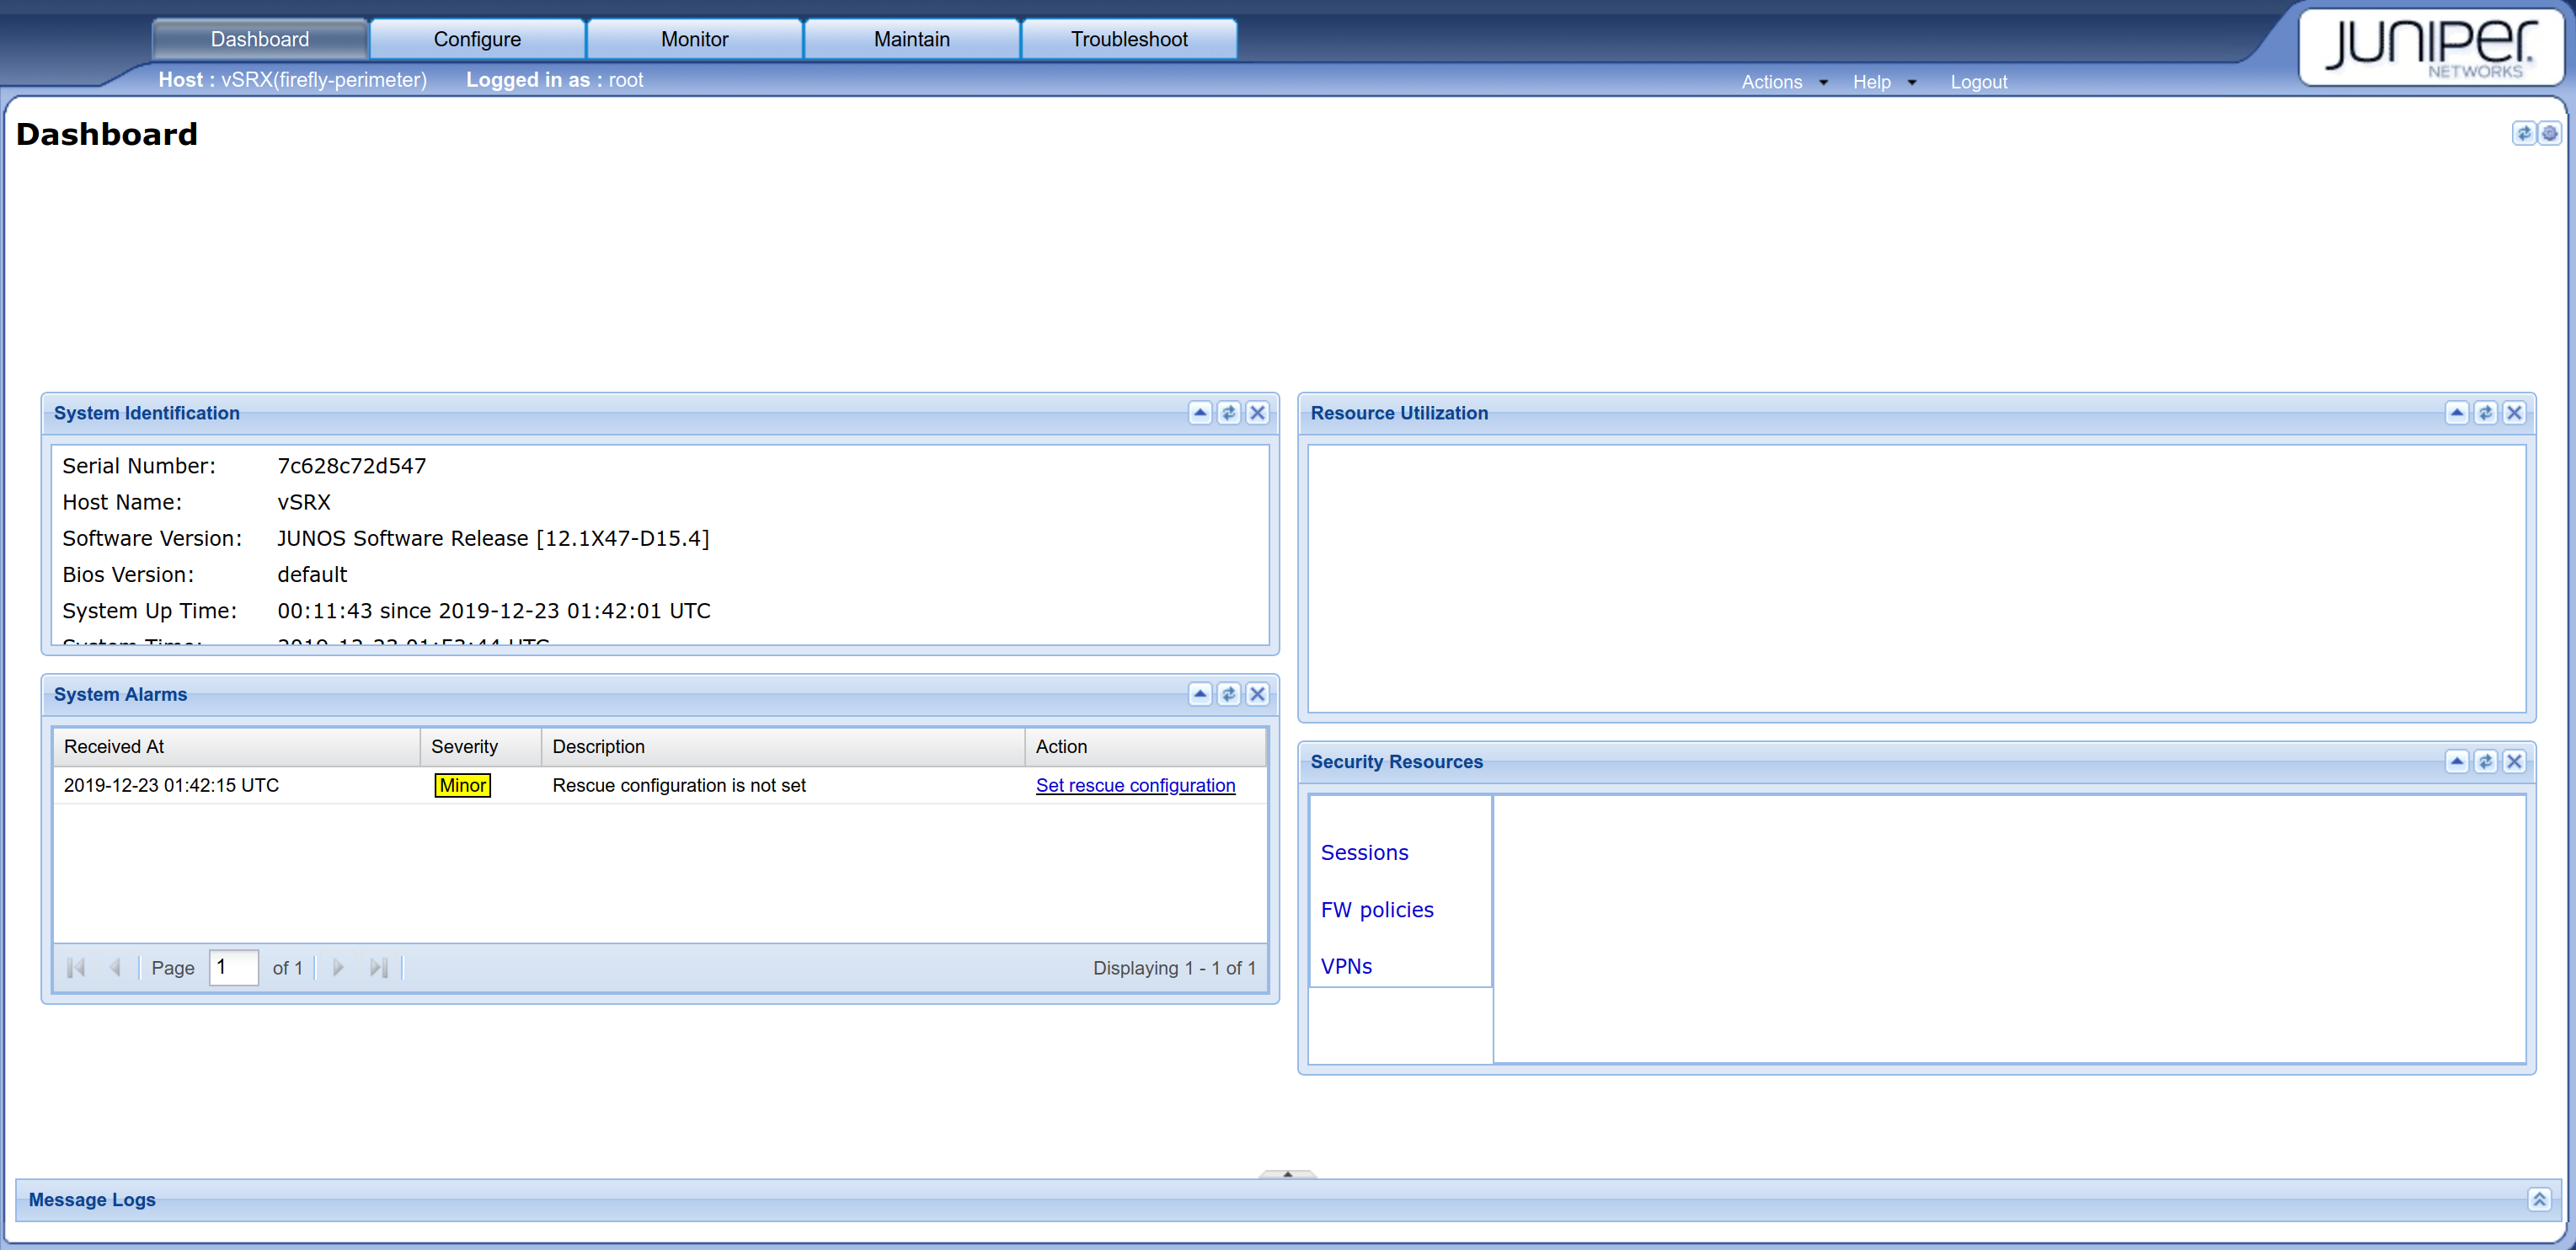
If you prefer, you could manage the firewall from the web interface, jweb, too:

Login with root / Juniper:
Problems? Just 'vagrant destroy' and start again. Other things to consider? Do you really need to keep UFW running? :)